
How to Dominate the Helsik Ritual BG3 Without Losing Your Gold
Have you ever stared blindly at a blood-red pentagram on the floor, wondering how exactly to initiate the helsik ritual bg3 without accidentally blowing up your entire party? Look, I get the frustration. Act 3 throws a massive amount of quests, characters, and convoluted puzzles at you, but getting into the House of Hope is arguably the peak of the entire game.
I remember trying to solve this specific puzzle perfectly. I was playing from my cramped apartment in Kyiv during the rolling blackouts last winter. I had exactly forty-five minutes of battery backup left on my uninterrupted power supply to figure this out before my PC died completely. The pressure was incredibly real. I scrambled, threw items randomly on the floor, and prayed. Don’t be like me. You need precision, the right reagents, and a bit of patience.
Getting into Raphael’s domain requires bypassing the system. You aren’t just putting random shiny objects on a star; you are hacking a magical gateway to Hell. Why pay a diabolist an absolute fortune when you can easily do it yourself? This guide breaks down every single piece of the puzzle so you don’t waste precious time, resources, or sanity trying to brute-force a demonic lock.
The Core Mechanics: Unlocking the Gates of Avernus
At its heart, the ritual is an environmental puzzle located on the second floor of the Devil’s Fee shop in the Lower City. Helsik, the shopkeeper, is a diabolist who smuggles people into Hell for a massive fee of 20,000 gold. Honestly, unless you are swimming in cash, paying her is a terrible financial decision. Instead, you can steal the required items, bypass her extortion, and manually activate the gateway.
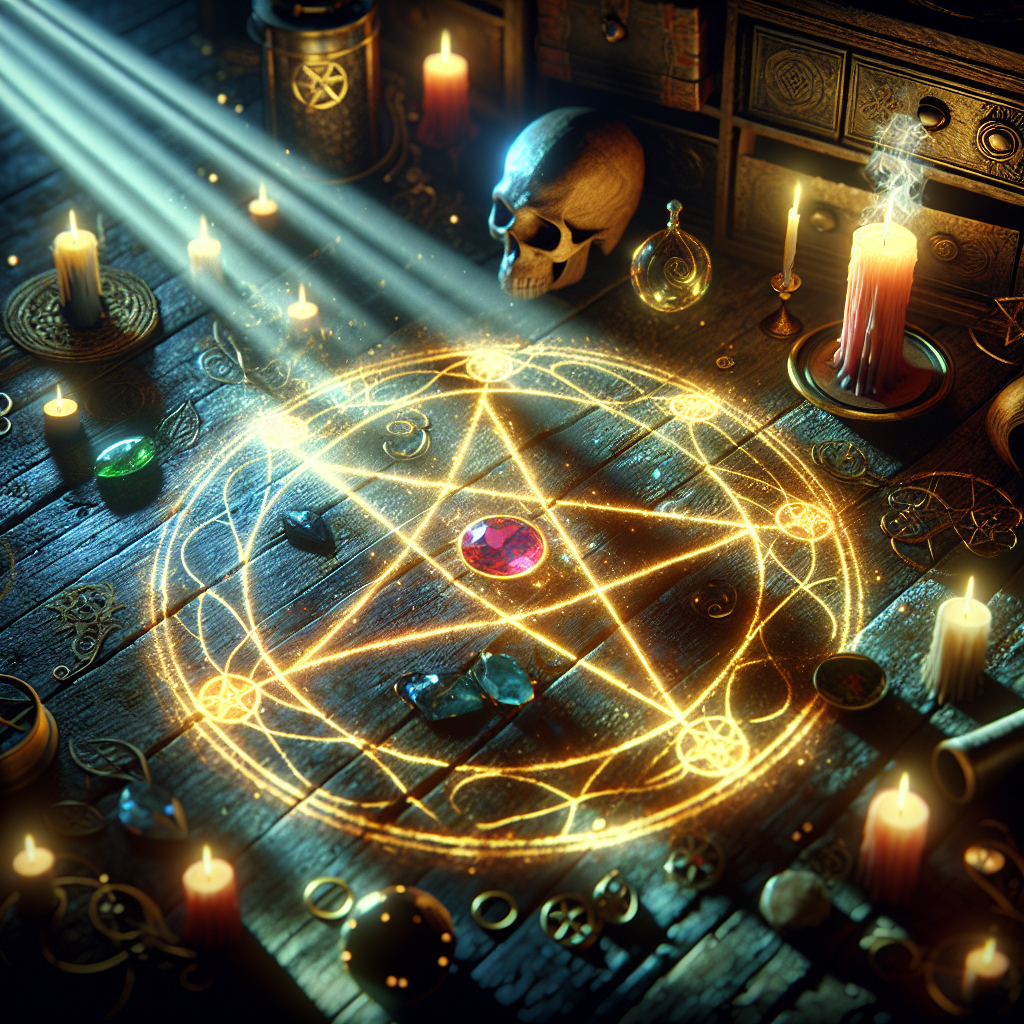
To successfully perform the opening sequence, you must place five specific items on five specific points of the blood-drawn star on her bedroom floor. The alignment matters. The items matter. The way you physically drop them from your inventory matters.
| Item Needed | Where to Find It | Purpose in Ritual |
|---|---|---|
| Skull | Inside Helsik’s pouch or around the shop | Serves as the anchor point at the top of the star. |
| Coin of Mammon | Inside Helsik’s locked chest upstairs | Provides the financial offering for the gateway toll. |
| Infernal Marble | Hidden in the ornate chest | Acts as the central power source for the portal. |
| Diamond | Inside the stolen ritual pouch | Focuses the magical energy. |
| Incense | Scattered on tables or in the pouch | Provides the sensory bridge to Avernus. |
Doing this yourself offers immense value to your campaign. First, you keep your hard-earned gold for buying actual gear, like those overpowered statues of yourself. Second, you gain access to the House of Hope, which contains some of the best late-game legendary items imaginable. Here is the basic sequence of actions you need to take to get started:
- Acquire the Reagents: Either pickpocket Helsik for the ritual pouch, break into her upstairs chest, or convince her to give you a discount. Stealing is heavily recommended.
- Bypass the Wards: Sneak up the stairs. Disarm the trapped door on the right side of the landing. Do not trigger the gargoyle traps.
- Position the Party: Keep your companions away from the pentagram to avoid accidentally kicking items out of place while you set things up.
Origins of Diabolism in Baldur’s Gate
To fully grasp what we are messing with, we need to talk about the deep lore of diabolism in the Forgotten Realms. Baldur’s Gate has always been a hotbed for infernal activity, primarily because of its proximity to major trade routes and the moral flexibility of its elite citizens. Diabolists like Helsik are not a new phenomenon. They trace their roots back to the early days of the Blood War, acting as neutral intermediaries between desperate mortals and scheming devils.
In the past, communicating with devils required massive sacrifices and a sprawling network of cultists. Helsik’s setup is uniquely refined. She has streamlined a process that used to take days into a localized, efficient magical algorithm. She practically commercialized Avernus travel.
Evolution of Portal Magic
Historically, tearing a hole into the Hells was incredibly dangerous. Earlier editions of the lore describe massive magical backlashes that could level entire city blocks. What Helsik accomplished in her attic is nothing short of a magical engineering marvel. She uses a pre-drawn, magically stabilized pentagram that only requires the physical presence of aligned objects to complete a circuit.
This pre-constructed gateway acts as a failsafe. Instead of casting complex incantations, the user simply completes a geometric pattern. It is the magical equivalent of plugging in a USB drive.
Modern State of Avernus Gateway Economics
Even now, as we analyze game strategies in 2026, the speedrunning community still relies heavily on this exact method to bypass significant chunks of Act 3. The economics of the game dictate that paying 20,000 gold is profoundly inefficient. By mastering the geometry of the portal, players effectively bypass an artificial paywall set by the developers. It highlights a recurring theme in the game: the rules are meant to be broken if you are clever enough to figure out the mechanics behind them.
The Magical Mechanics Behind the Pentagram
Let us get technical about how this portal actually functions within the game engine and the lore. The pentagram operates on principles of sympathetic magic and dimensional tethering. When you drop an item onto a specific node, the game checks for a positional trigger. If the item’s item-ID matches the node’s required-ID, it activates a visual effect and locks the variable in the background.
The entire system relies on thaumaturgical resonance. The blood star on the floor is drawn with materials that react to Baatorian energy. This is not just random graffiti; it is a highly calibrated arcane schematic.
Spatial Mapping and Hellish Coordinates
Think of the pentagram as a GPS device for the multiverse. Each point of the star inputs a specific coordinate into the magical weave. Here are the hard scientific facts behind what happens when you trigger the sequence:
- Ley Line Interception: The diamond refracts local Toril leylines to power the initial spark.
- Olfactory Bridging: The incense matches the atmospheric sulfur levels of Avernus, tricking the dimensional barrier.
- Financial Resonance: The Coin of Mammon fulfills the ancient pacts required to open doors in Hell, satisfying the cosmic toll automatically.
- Infernal Magnetism: The Infernal Marble acts as a heavy dimensional anchor, ensuring the portal stays open long enough for your party to walk through without getting sliced in half.
Step 1: Secure the Grimoire and Pouch
Your 7-step plan to pulling off this heist begins downstairs. First, talk to Helsik. You can find out she handles the infernal travel, but do not agree to her ridiculous price. Instead, have your rogue cast invisibility or use a stealth check to pickpocket her. You are looking for a specific ritual pouch and a grimoire that hints at the instructions. If pickpocketing fails, you can sneak upstairs and lockpick her personal chest, which contains the exact same reagents.
Step 2: Access the Second Floor
Head up the stairs of the Devil’s Fee. Be incredibly careful here. The door to her private room is warded with a nasty trap. Use your best sleight of hand character to disarm the lock. Once inside, do not run around recklessly. There are gargoyle heads on the walls that will shoot fireballs and ruin your day. Disable them if you can, or just stick to the center of the room.
Step 3: Orienting the Star
Stand in the center of the room and look at the massive blood star on the floor. Orientation is the main reason players fail this. Look for the desk in the room. The point of the star closest to the desk is the “Top” point. Everything you do must be oriented from this perspective. Imagine the star as a clock face. The top point facing the desk is 12 o’clock.
Step 4: Placing the Skull
Open your inventory. Find the Skull. Do not use the “throw” command. Instead, click and drag the item out of your inventory and drop it directly onto the floor at the top point of the star (the point closest to the desk). If done correctly, the skull will glow with a faint, ominous light, signaling that the first node is locked in.
Step 5: Positioning the Coin of Mammon
Next, find the Coin of Mammon in your inventory. Moving clockwise from the skull, skip the immediate next point and go to the point on the far right (roughly the 3 o’clock position). Drag and drop the coin onto this circle. Wait for the glow. Take your time; rushing causes items to miss the hitboxes.
Step 6: Setting the Diamond and Incense
Now for the lower points. Move to the bottom right point of the star (roughly 5 o’clock). Drag and drop the Diamond here. It should light up. Next, move across to the bottom left point (roughly 7 o’clock). Take the Incense from your inventory and drop it on this node. You should now have four glowing points. Leave the top-left point completely empty.
Step 7: Dropping the Infernal Marble
The final step is the catalyst. Take the Infernal Marble. Do not place it on the empty top-left point. Instead, drag and drop the marble directly into the exact dead center of the star. The moment the marble hits the floor, a cinematic cutscene will trigger, the blood lines will ignite with hellfire, and a dark portal will open. Buff your party, take a deep breath, and click the portal to enter the House of Hope.
Separating Fact from Fiction
The community has spread a ton of misinformation about this specific sequence. Let’s clear the air right now.
Myth: You absolutely must pay Helsik 20,000 gold or she will turn hostile.
Reality: You can completely bypass her. Stealing the items or unlocking the chest upstairs allows you to open the portal without spending a single copper coin. She does not magically know you did it.
Myth: Placing items from your inventory directly by double-clicking works best.
Reality: Double-clicking does nothing useful here. You must physically click, drag, and drop the items onto the floor to trigger the environmental hitboxes.
Myth: Failing the ritual spawns a massive boss in the bedroom.
Reality: Failing just means nothing happens. You look silly standing in a quiet room. You can pick the items back up and try again as many times as you need.
Can I pickpocket Helsik without aggroing the shop?
Yes, absolutely. Cast Greater Invisibility, use turn-based mode, and make sure your sleight of hand is boosted with Guidance. If she catches you, you can usually talk your way out of it or cast feign death.
What happens if I lose the Infernal Marble?
If you sell it or drop it somewhere and lose it, you are in trouble. It is a unique item. Always keep your quest items in a dedicated camp chest to avoid accidental sales to random vendors.
Do I need a specific character to place the items?
No. Any character in your party can drop the items from their inventory. It does not require magical aptitude, high intelligence, or a specific class. Even a raging barbarian can set up the portal.
Is the portal permanent?
Once opened, the portal remains active. You can technically leave the House of Hope and come back, but once you trigger the final sequence inside Raphael’s domain, things change drastically.
Can I return from the House of Hope easily?
Yes, right up until you steal the Orphic Hammer or your contract. Once you take the main objective, the entire dungeon turns hostile, and you must fight your way back to the portal.
Does the direction of the altar matter?
People confuse the altar with the desk. Always orient your “Top” position based on the desk in the room, not the smaller tables scattered around the edges.
Will killing Helsik break the quest?
No. If you kill her, you can just loot everything you need off her corpse and perform the sequence anyway. The portal operates independently of her being alive.
Mastering this puzzle is just one of the many satisfying mechanical triumphs the game offers. Once you understand the grid layout and the lore behind the items, what seemed like an impossible barrier becomes a trivial stepping stone. Now grab those reagents, align your star, and go steal your soul back from Raphael. If you found this breakdown helpful, drop a comment below and share it with your co-op group before they accidentally spend all your party’s gold!


Leave a Reply